
Introduction to Handyman Skills
Handyman skills have become increasingly vital for homeowners seeking to maintain their properties efficiently and cost-effectively. Having a basic understanding of these skills can save considerable amounts of money on professional repairs, enabling homeowners to take charge of their living spaces. The ability to tackle common household issues not only alleviates financial burden, but also significantly reduces the stress associated with unexpected repairs.
Homeowners frequently encounter a variety of tasks that, while seemingly minor, can result in substantial inconvenience if left unaddressed. Examples include fixing leaking faucets, patching drywall, tightening loose doorknobs, or changing light fixtures. These issues often arise unexpectedly, and knowing how to handle them can prevent escalated damage and the need for more extensive repairs down the line. Furthermore, by understanding these fundamental handyman skills, homeowners gain the confidence to manage such tasks themselves, turning what might have been a daunting or overwhelming project into an achievable goal.
Moreover, possessing handyman abilities facilitates better communication with contractors or service professionals should the need to hire outside help arise. Homeowners with a grasp of common repairs are less vulnerable to being overcharged or misled because they understand the scope of work involved. Overall, honing handyman skills not only empowers individuals in their home maintenance endeavors, but also enhances the overall upkeep and longevity of one’s property.
This guide aims to equip readers with practical advice and step-by-step instructions across various repair scenarios. By embracing handyman skills, individuals will find themselves better prepared for both minor and moderate home repairs, ultimately fostering a more proactive approach to home maintenance.
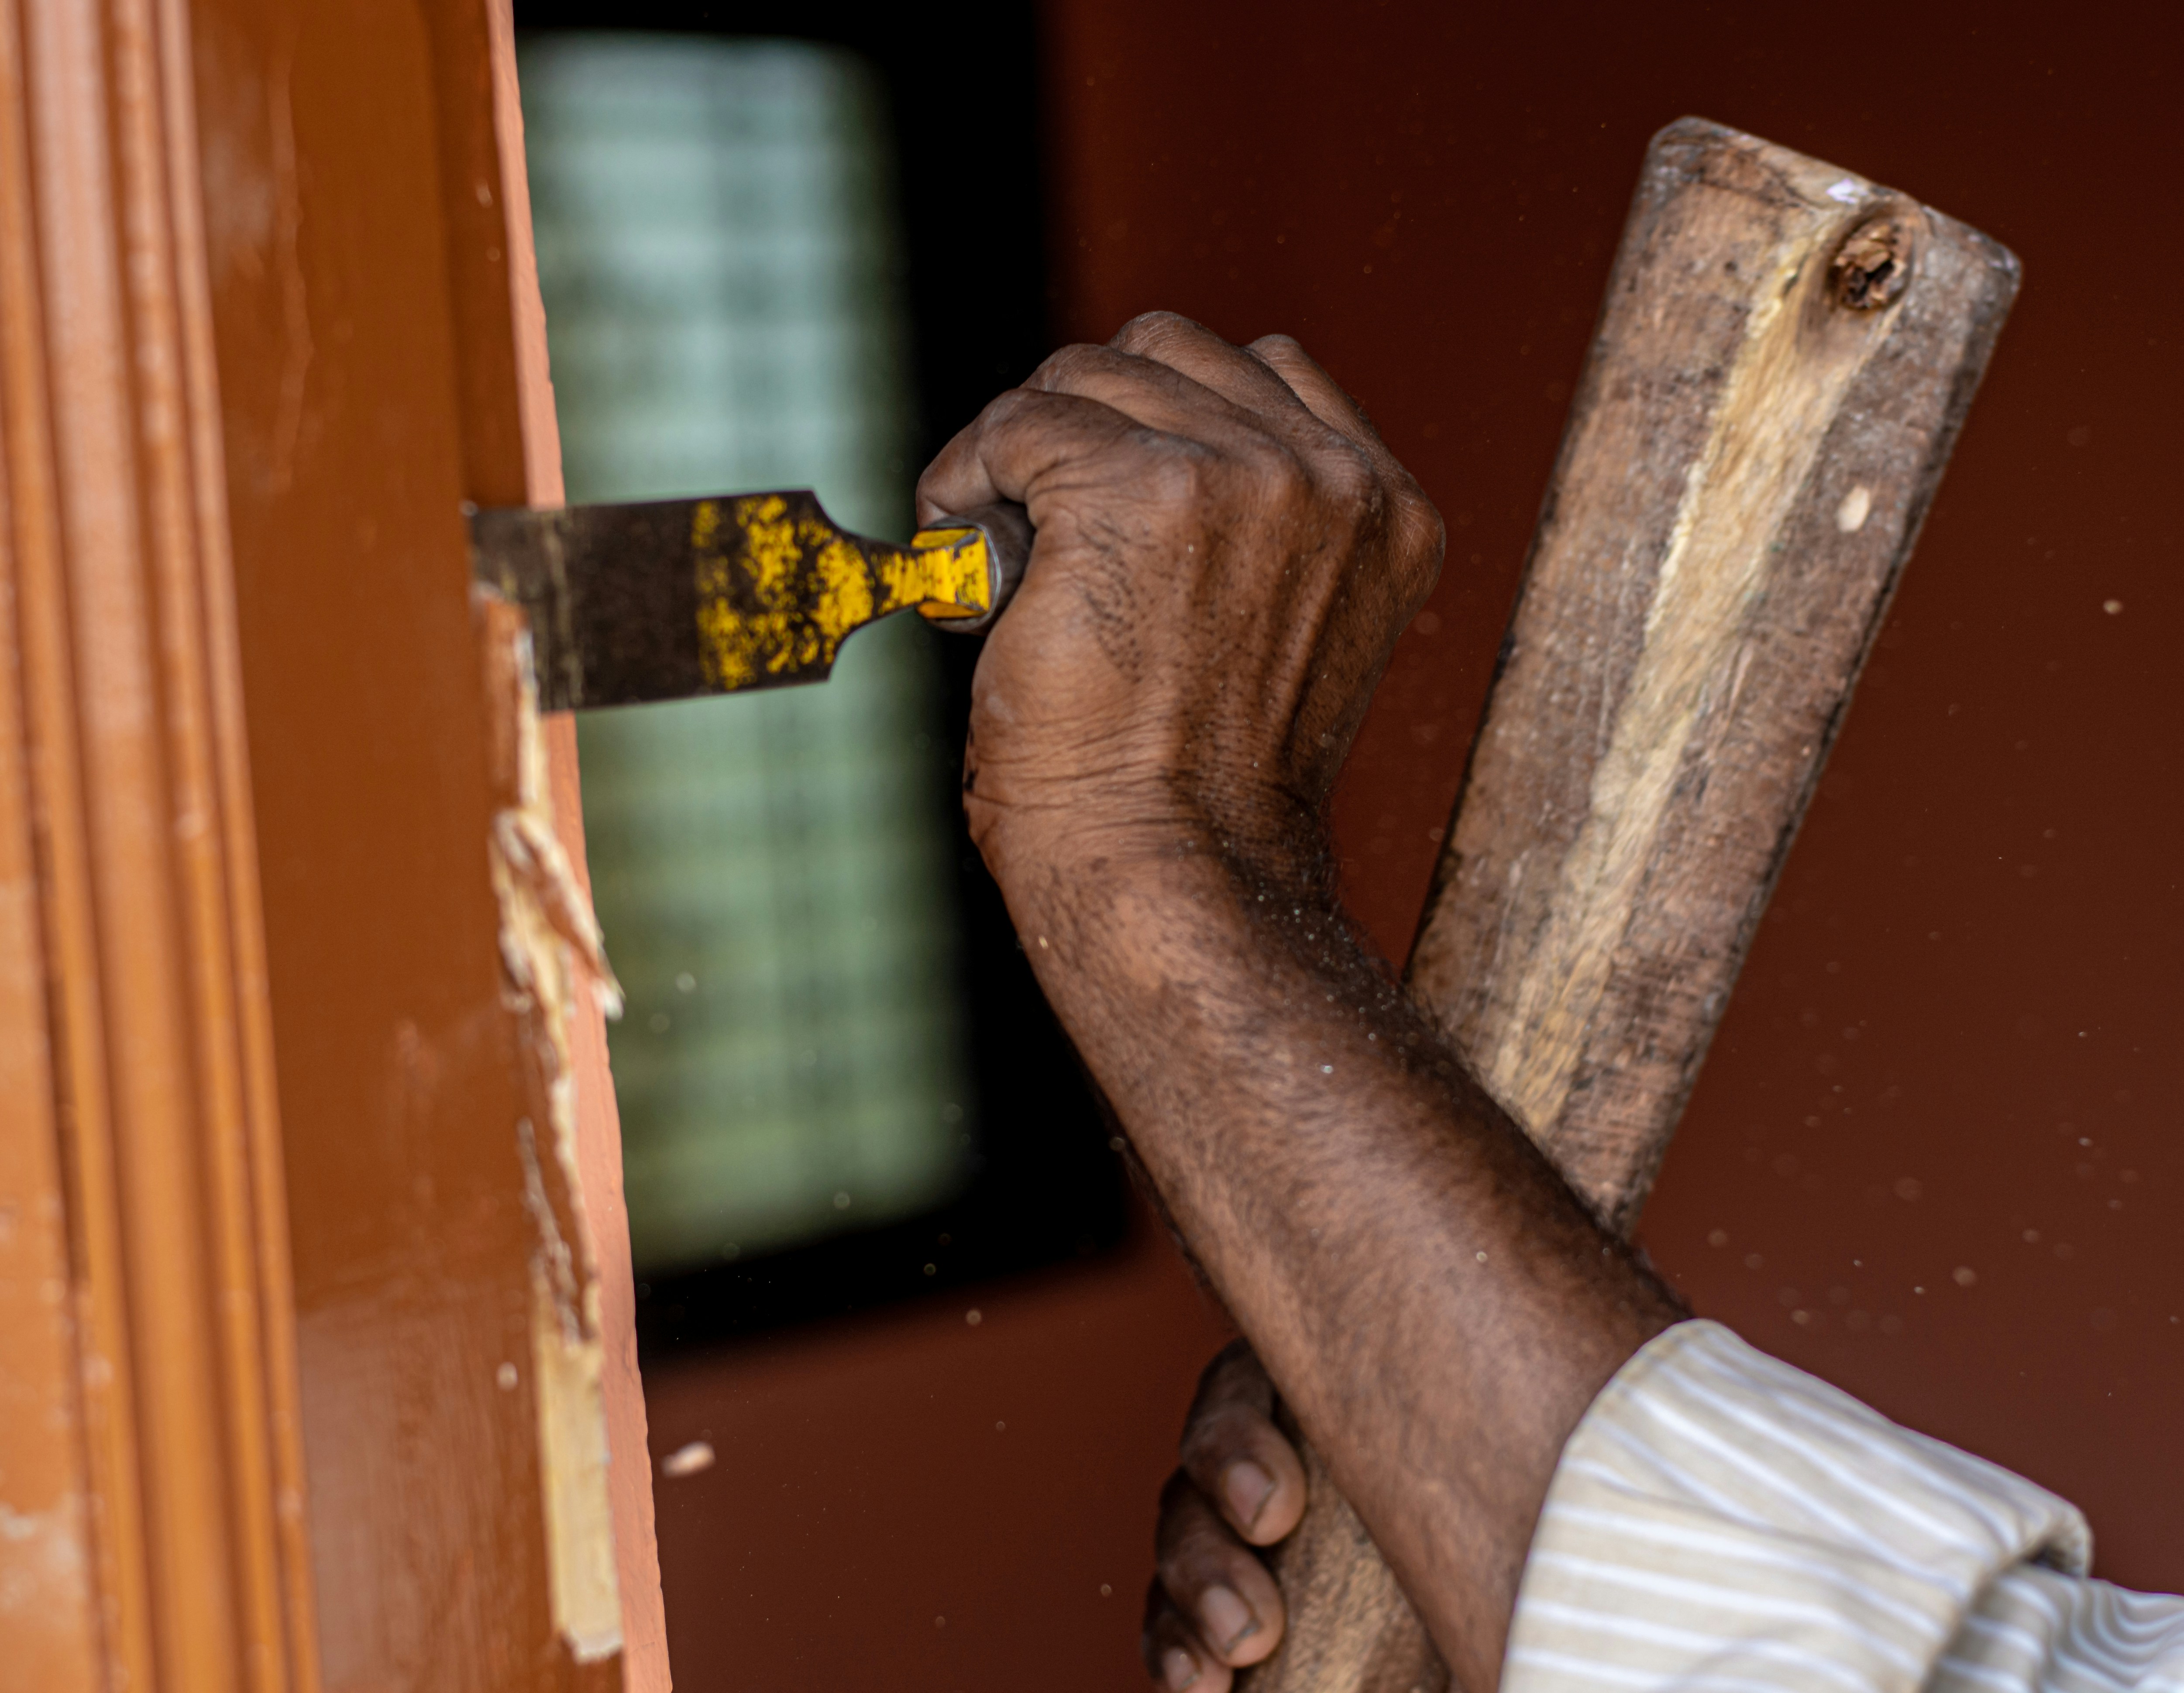
Drywall Repair: A Step-by-Step Guide
Repairing drywall is a fundamental skill for any handyman, as it addresses common issues like holes and cracks that can detract from a home’s appearance. To ensure a successful repair, it is essential to gather the right tools and materials beforehand.
Start by collecting your supplies, which typically include a utility knife, drywall patching compound, a putty knife, sandpaper (medium and fine grit), a bucket, and a damp cloth. Additionally, consider having a drywall patch if dealing with a larger hole, as well as a dust mask and safety goggles to protect against debris.
The first step in the repair process involves preparing the damaged area. If the hole is particularly large, use the utility knife to create a neat square or rectangular cut around the damaged section to make it easier to apply the patch. For smaller cracks, simply clean the area with the damp cloth to remove any dust or loose particles. This preparation is key to achieving a smooth, professional finish.
Next, if you are using a drywall patch, place it over the hole, ensuring it is adequately secured. For smaller holes or cracks, the patching compound can be applied directly to the area. Using the putty knife, spread a generous amount over the damaged area, smoothing it out to blend with the surrounding surface. Allow the compound to dry as recommended by the manufacturer—usually around 24 hours.
Once dry, sanding is necessary to create a seamless appearance. Start with medium grit sandpaper, followed by fine grit for a smooth finish. After sanding, wipe away any dust with a damp cloth. Finally, the area may need to be primed and painted to match the rest of the wall, concealing the repair and restoring your interior space. Proper technique, from preparation to finishing touches, is essential in achieving a durable and aesthetic outcome.
Furniture Assembly Made Easy
Furniture assembly is a task many homeowners encounter, particularly with the popularity of flat-pack furniture. This type of furniture, designed for convenient transport and storage, often comes with an array of components that require assembly at home. Common examples include IKEA products, ready-to-assemble bookshelves, desks, and various types of chairs. Proper assembly not only ensures functionality but also enhances the aesthetic appeal of your space.
The first step in successful furniture assembly is to gather all necessary tools. Common tools needed include a Phillips screwdriver, an Allen wrench (often included with the furniture), a hammer, and a level. Having a tape measure can also be beneficial for ensuring that the assembled furniture fits perfectly within the designated space. It can be prudent to have a pair of scissors handy to remove packaging and a soft cloth to wipe down surfaces as you work.
A key strategy in assembly is organization. Begin by unboxing the furniture and laying out all pieces systematically. This should include sorting screws, bolts, and dowels into separate piles. Visualizing the finished piece can help, so it’s advisable to keep the instruction manual in view. Following the step-by-step instructions provided is essential, ensuring each component is correctly aligned before fastening it in place. Securing parts loosely is often recommended at first, allowing for small adjustments before final tightening.
Time management is paramount during furniture assembly. Allocating specific blocks of time to assemble each piece can reduce frustration and enhance focus. Avoid distractions by creating a conducive environment for assembly, whether it be setting up in a spacious room or clearing a workspace. With patience and methodical organization, furniture assembly can transform from a daunting task into a manageable and even enjoyable experience, resulting in the efficient creation of functional home furnishings.
Adjusting Doors: Techniques for Perfect Alignment
Misaligned doors are a common issue that can lead to various inconveniences, such as difficulty in closing or excessive gaps around the door frame. To effectively address this problem, it is essential to understand how to identify the root cause of the misalignment and undertake simple adjustments. The process generally begins with examining the door and its frame to determine whether the misalignment stems from hinges or latches.
To begin the adjustment, the necessary tools include a screwdriver, a level, and possibly a wood shim for more significant misalignments. A standard screwdriver will suffice for most hinge adjustments, while the level allows for precision, ensuring that the door hangs evenly. Wood shims may be required if the door frame is warped, helping to provide support where necessary.
The first step in aligning a misaligned door is to tighten any loose screws on the hinges. Over time, screws may loosen due to regular use, leading to misalignment. If the door still does not align, it may be necessary to remove the hinges, examine their condition, and check for wear. Should the hinges be damaged, replacing them might be the best solution.
Next, adjust the hinges by repositioning them slightly. Loosen the hinge screws, and use the level to determine the correct vertical alignment. You may need to add shims behind the hinges to achieve the desired height. Once satisfied with the positioning, retighten the screws securely.
Additionally, ensure that the latch is aligned with the strike plate on the door frame. If the door still does not latch correctly, minor adjustments to the strike plate may be required. With careful consideration and the right tools, homeowners can achieve perfect door alignment, enhancing the functionality and appearance of their living space.
Shelving Installation: Creating Functional Space
Installing shelves in your home is a practical way to enhance storage space while contributing to the overall aesthetics of your living environment. This section will provide a comprehensive guide to installing different types of shelves, specifically focusing on floating shelves and standard wall-mounted shelves. Both options offer unique benefits and can be tailored to your specific needs.
Before beginning your shelving project, it is essential to gather the necessary tools. These typically include a stud finder, level, measuring tape, a drill, screws, and anchors. If you are installing floating shelves, you will also need brackets designed for this type of shelf. Proper measurements are crucial; determine the desired height and spacing for your shelves, ensuring they suit the items you plan to display or store.
For standard wall-mounted shelves, start by locating the wall studs using your stud finder, as this will provide the necessary support. Mark the positions for your brackets based on the width of the shelf. Use your level to ensure the brackets are aligned horizontally before securing them with screws. For heavier items, it’s advisable to use wall anchors for additional stability.
When installing floating shelves, the process involves a few additional steps. First, mark the locations for your bracket installations and drill into the wall accordingly. Secure the brackets and slide the shelf onto them, ensuring it sits flush against the wall. This technique not only creates a sleek, modern look but also maximizes wall space, leaving floors clear.
Throughout the installation process, prioritize safety. Ensure ladders are stable and use protective eyewear when operating power tools. By following these guidelines, you can successfully install shelves that are not only functional but also enhance the design of your home.
Maintenance Tips for Common Home Repairs
Regular maintenance is crucial for the longevity of household items and can significantly reduce the need for extensive repairs. Implementing a systematic approach to inspections and upkeep can keep various components in optimal condition. For instance, checking drywall regularly for signs of wear or damage can help identify issues early. Minor cracks or holes should be addressed immediately with spackle or joint compound to prevent them from worsening.
Moreover, furniture care is essential for maintaining its appearance and stability. Dusting surfaces weekly and applying a suitable polish every few months can protect wood finishes. For upholstered furniture, vacuuming regularly eliminates dirt and dust that can deteriorate fabric fibers. Additionally, rotating cushions can extend their lifespan by preventing uneven wear.
Doors and windows are other key areas that require attention. Inspect the door hinges and locks monthly to ensure they are functioning properly and lubricate them as needed. During the seasonal changes, verify that the weather stripping around doors and windows is intact to maintain energy efficiency. Moreover, it is wise to check for loose screws or hinges and tighten them promptly to prevent further damage.
Regarding shelving, it is beneficial to perform quarterly inspections to ensure stability and integrity. Look for signs of sagging or looseness and make necessary adjustments or repairs. If shelves are overloaded, consider rearranging items to distribute weight evenly, which can prevent collapse. Utilizing wall studs for support when installing heavy shelves can also alleviate potential issues.
By incorporating these maintenance tips into your routine, you can reduce the risk of needing repairs and ensure a well-functioning home environment. Consistent checks and proactive actions can save homeowners both time and money in the long run.
Safety First: Best Practices for DIY Projects
When it comes to performing handyman tasks, safety should always be the paramount concern. Engaging in DIY projects can be rewarding, but it also poses various risks if not approached with caution. Personal Protective Equipment (PPE) is an essential aspect of ensuring safety while undertaking repairs or renovations. Proper PPE can include safety goggles to protect your eyes from debris, gloves to shield your hands from sharp edges, and dust masks to prevent inhalation of harmful particles. Wearing appropriate footwear can also minimize the risk of slips and falls, which are common hazards in a worksite.
In addition to personal protective gear, safe handling of tools is critical for avoiding injuries. Each tool has specific usage guidelines, and it is imperative to familiarize oneself with these instructions before starting a project. This includes understanding how to operate power tools, as incorrect use can lead to severe accidents. Always ensure that tools are in good condition and that any damaged equipment is repaired or replaced before usage. Furthermore, when working with electrical tools, it is crucial to ensure the work area is dry, and to never operate such tools with wet hands or in damp conditions.
Creating a safe working environment is equally important. A cluttered workspace can lead to accidents, so it is advisable to keep the area clean and organized. Clear away unnecessary clutter and ensure that all tools and materials are stored safely when not in use. Adequate lighting also plays a significant role, as it enhances visibility and reduces the likelihood of missteps. Finally, always have a first aid kit readily available to promptly address any minor injuries that may occur. Adhering to these best practices will not only help to ensure personal safety but will also contribute to the overall success of any DIY project.
When to Call a Professional
Home repairs can often be tackled by the homeowner, but there are specific scenarios where enlisting the help of a professional handyman is advisable. Recognizing the complexity of a task and being aware of potential risks associated with DIY projects is crucial for ensuring both safety and the integrity of your home. One of the primary indicators that a professional is necessary is the complexity of the task at hand. For instance, electrical work and plumbing replacement typically require specialized skills and knowledge that many homeowners may lack. Mishandling electrical wiring can lead to hazardous situations, including fires or electrocution, while improper plumbing repairs may result in significant water damage and costly repairs.
Moreover, the scale of a project is an important consideration. Projects that involve structural changes, such as significant renovations or repairs relating to load-bearing walls, should always be handled by a licensed professional. These types of changes can compromise the structural integrity of the home and, consequently, may pose safety hazards. Additionally, obtaining necessary permits and adhering to local building codes is essential, and a professional handyman will have expertise in navigating these regulations.
Another factor to contemplate is your level of comfort with the task. If you find yourself feeling anxious or uncertain about how to proceed, it is likely a sign that you should seek expert help. Professionals possess the experience and tools required to efficiently and effectively complete tasks, reducing the likelihood of mistakes and ensuring that the repair is performed to a high standard. In cases of injury risk or complicated repairs, relying on a professional handyman can save time, stress, and potential financial loss.
Connecting with Local Pros: Introducing Trashstache
For homeowners seeking assistance with handyman tasks that surpass basic DIY capabilities, Trashstache provides an invaluable resource for connecting with local professionals. This platform is designed to seamlessly facilitate the hiring of skilled experts who are equipped to handle a wide range of home repair and improvement projects. Whether it’s plumbing, electrical work, carpentry, or general maintenance, Trashstache can simplify the process of finding reliable help in your vicinity.
The functionality of Trashstache is straightforward. Users can visit the website or mobile application, where they are prompted to specify the type of service needed. By entering relevant details, such as the nature of the task and the location, homeowners are instantly matched with local professionals who have the necessary expertise. The platform allows users to review profiles and ratings, enabling informed choices tailored to individual project requirements.
Trashstache offers a diverse range of services, from small repairs to extensive renovations. This versatility ensures that whether you require a quick fix for a leaky faucet or a complete overhaul of your kitchen, you can find a qualified local pro ready to assist. Additionally, all professionals listed on the platform are pre-screened, which adds a layer of reassurance for homeowners concerned about the quality and reliability of the service rendered.
Engaging with local professionals through Trashstache presents numerous benefits. Firstly, it supports the local economy by connecting residents with businesses in their area. Secondly, it fosters a sense of community, as homeowners can find trusted professionals who are invested in building their reputation locally. Ultimately, Trashstache empowers homeowners to tackle home repairs efficiently and confidently by bridging the gap between them and skilled tradespeople.